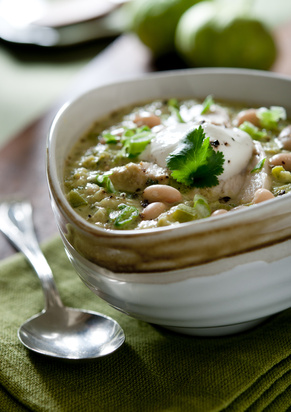
AUTUMN CHICKEN CHILI VERDE
Chicken Chili Verde is a savory pot of goodness that doesn’t have to simmer or slow-cook all day to reach it’s flavorful perfection making it a good fit for just about any day on your calendar. That being said, you can do a long simmer or slow-cook if you’d like your kitchen to smell good all day and/or need dinner to be ready when you return from a busy day out. Be sure to have a little extra broth on hand if you go that route as the chili may thicken too much due to evaporation.
- Makes 10-12 hearty-size bowls
- Freezes well
This is a personal recipe I recently threw together in our kitchen and you should be aware that I’m not really one to measure ingredients; however, I am quite certain I used more than the amounts noted for the spices. Families with preferences more towards a mild flavor are safe to go with the noted amounts as this is a large batch of chili and the flavors have to stretch pretty far.
Carrots are not traditionally found in chili, but I had some and thought they would add nutritional value. I was out of celery when I made this, but will throw some in for extra fiber in the future.
For an autumn twist, substitute the carrots for a couple cups of peeled and ‘finely’ chopped pumpkin, butternut or acorn squash, parsnips, or rutabaga. Skip the turnips though. As much as I love them, they’re too pungent for this chili.
Ingredients:
- Olive oil, cover bottom of pan
- 5-6 Chicken breasts, boneless, skinless, diced
- 2 cloves garlic, finely chopped
- 2 Vidalia onions, finely chopped
- 3-4 carrots, finely chopped
- 4 tsp cumin, more to taste
- 2 tsp chili pepper, more to taste
- Salt, to taste
- Fresh ground pepper, to taste
- 6 TB flour
- 2 cans (14.5 oz) chicken broth
- 1 can (14.5 oz) diced tomatoes with juice
- 2 cans 4 oz. chopped green chiles, drained
- 2 cans (15.8 oz) Great White, Northern, or Canneloni beans, drained and rinsed
Toppings:
- Shredded Cheddar or Monterey Jack cheese
- Sour cream
- Salsa
- Fresh cilantro leaves
*Toppings are optional, but I highly recommend them as they enhance the flavor and texture of the chili.
On the Side:
Serve with warm flour tortillas, heating a couple per person.
At our home, we use the stovetop method and place them directly into a tortilla warmer. Tortilla warmers are wonderful to have, but if you do not own one another type of covered dish will be fine.
Directions:
- In large pot, add enough olive oil to cover coat bottom of pan.
- Add diced chicken, garlic, onions, carrots, and spices. Cook over medium heat for several minutes until chicken is almost cooked through.
- If there is sufficient juice from chicken, add flour a couple tablespoons at a time mixing in with each addition. If there is not much juice from cooking chicken, add some broth.
- Keep stirring over medium heat until sauce begins to thicken.
- Once fairly thickened, add remaining broth, diced tomatoes with juice, and green chilies mixing with each addition. Once bubbly again, turn down to simmer for 15-20 minutes until flavors begin to develop.
- Taste to see if additional spices are needed. Add drained/rinsed canned beans and gently mix in and let simmer until heated through, approximately 5-10 minutes.
- Place a folded paper towel into your tortilla holder before you add the first one, so they do not stick to the bottom of the warmer.
- Warm tortillas one at a time placing them in tortilla warmer with lid as you go.
- Scoop into serving bowls and top as desired with shredded cheese, sour cream, salsa, and/or fresh cilantro leaves.
- Tortillas cool quickly, so place filled tortilla warmer on table and pass as people need more.
Food for Thought
“Al hambre de siete días, no hay pan duro.”
To a week’s hunger, there is no such thing as hard bread.
Menu Monday is a blog series dedicated to great food and menu planning.
